Blog & announcements
SCNX Sites is in active beta, and we're changing a lot of things as we go. We'll be reworking this documentation once the current beta cycle wraps up, so some details on this page may be outdated in the meantime.
Give your community somewhere to read your news. The blog is a set of posts with its own page on your site, an RSS feed, a block you can drop onto any page, and optional announcements in your Discord server.
The Blog screen
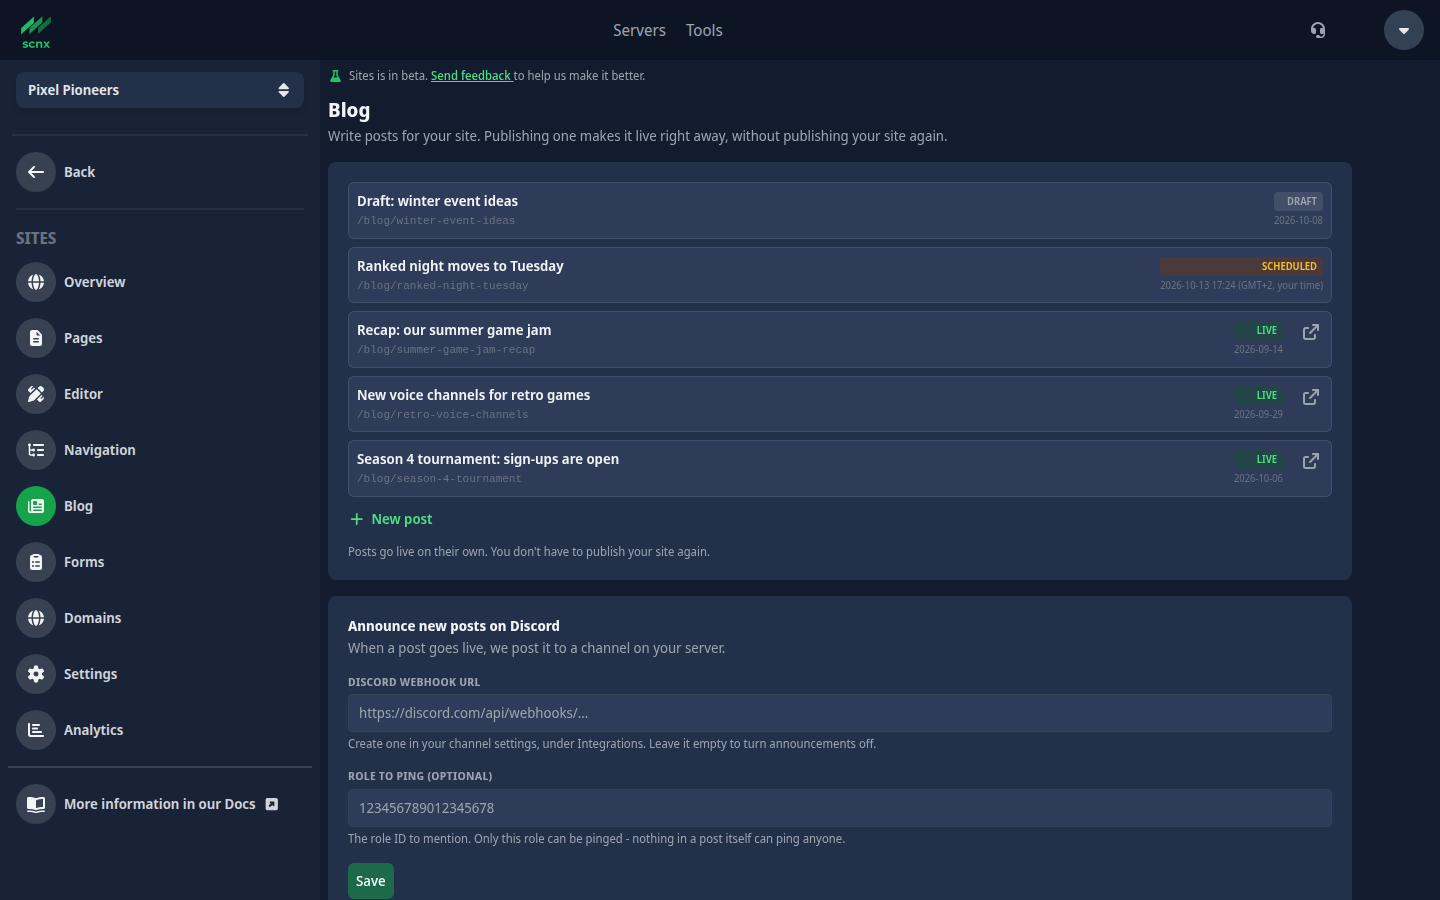
Open Blog in the Sites menu of your dashboard. This is home base for your blog:
- Your posts - every post, newest first. Each one shows its link (
/blog/<slug>) and a badge: Draft, Scheduled (with the time it goes out) or Live. Live posts have a small icon that opens the post on your site. - New post - starts a new post.
- Announce new posts on Discord - see Discord announcements.
- Blog layout - how posts are arranged on your blog page. See Layouts.
- Post page extras - turn the read time and the previous/next links on or off. See The post page.
Click a post to open it in the post editor.
Writing a post
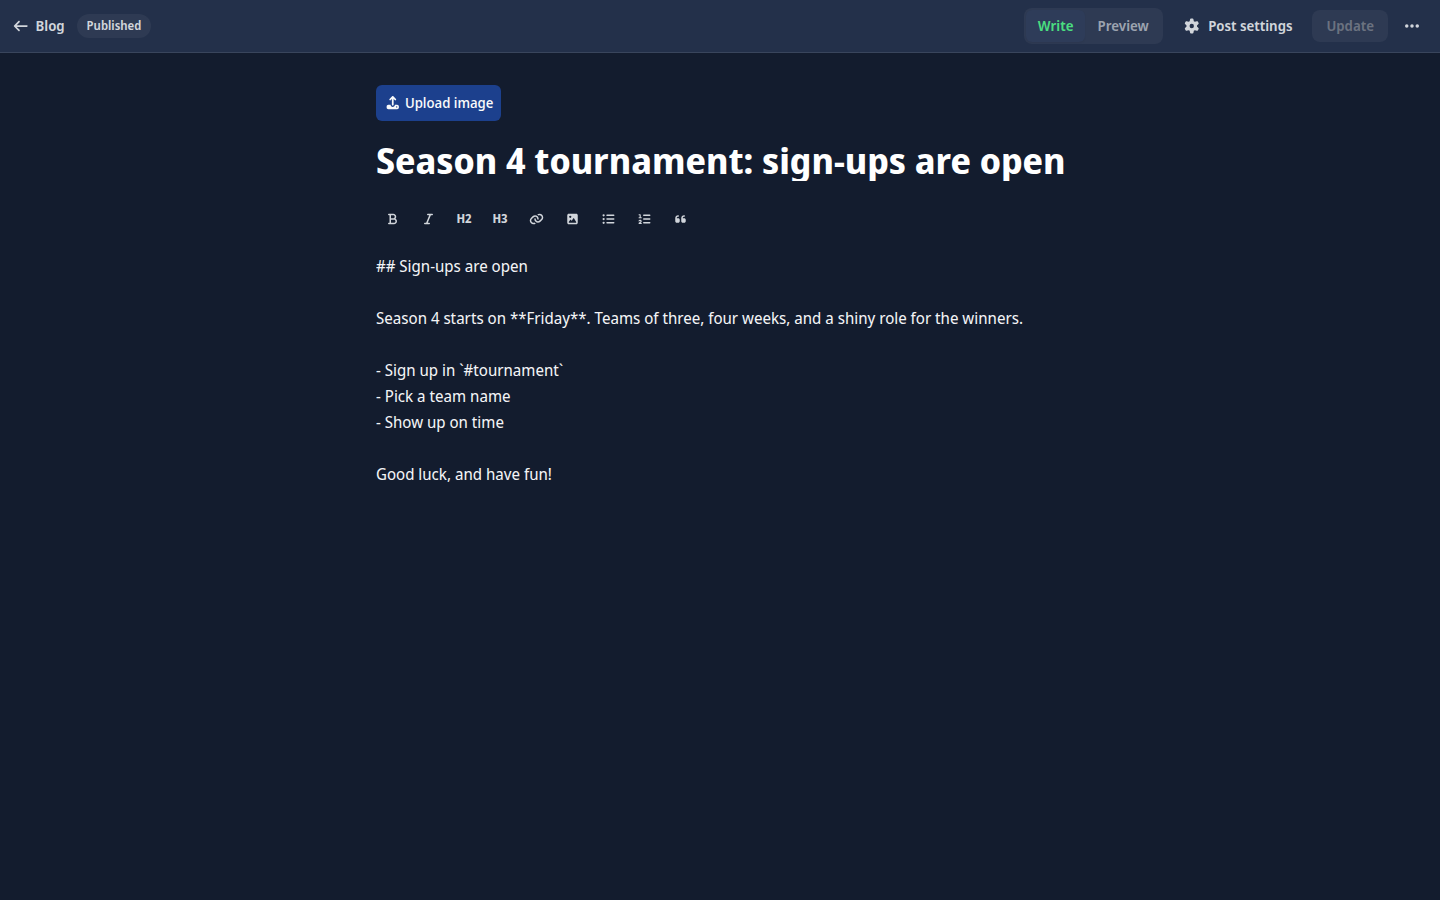
The post editor is a full-screen writing page with nothing else in the way. From top to bottom:
- Cover image - optional. Pick a picture from your server's image library. You can replace or remove it later.
- Post title - the headline of your post.
- The formatting bar - Bold, Italic, H2, H3, Link, Image, Bulleted list, Numbered list and Quote. Each button wraps the text you selected, or inserts the formatting where your cursor is. It stays at the top of the screen while you scroll.
- Your text - written in Markdown. The box grows as you write.
Shortcuts: Ctrl+B (bold), Ctrl+I (italic) and Ctrl+K (link). On a Mac, use Cmd instead of Ctrl.
A few things to know about the text:
- Images come from your server's image library. Use the Image button to pick one. Images from other websites are removed from the post.
- Links must start with
https://,http://ormailto:. On your site, they open in a new tab. - Headings: your post title is the main heading of the page, so a
#heading in your text shows up as a section heading. - If a post gets very long, a counter appears under the text and turns red when you are over the limit.
Saving happens on its own
You don't need to save. The editor saves a moment after you stop typing, and the top bar tells you how it went:
| Top bar shows | What it means |
|---|---|
| Saving… / Saved | Your changes are being saved, or are saved. |
| Add a title to save | A new post is only created once it has a title. |
| Not saved: fix highlighted fields | Something is not valid. Fix the field that is marked, and saving picks up again. |
| Not saved with Retry | Saving failed. Click Retry. If you try to leave, we warn you first. |
Saving never puts anything on your site. Only Publish and Update do that.
We also check posts for unsafe content when they are saved. If something is blocked, you see a message telling you what to change.
Post settings
Everything that is not the cover, title or text lives in Post settings in the top bar. It opens as a panel on the right. Close it with Esc or by clicking next to it.
- URL slug - the web address of your post. The full address is shown underneath. For a new post it follows the title until you change it yourself, and Reset to title builds it from the title again. It uses lowercase letters, numbers and dashes. Each post needs its own slug.
- Excerpt - a short teaser. It shows under the title on your blog page and in the Latest posts block, in your RSS feed, and in Discord announcements. Optional.
- Tags - short labels, shown on the post, on its card and in your RSS feed. Press Enter after each one. Tags you already used on other posts are suggested as you type.
- Author - shown on the post as a byline. It can be any name, like "The Mod Team". It does not have to be a Discord user. Leave it empty for no byline.
- Search & sharing - the Share title, Share description and Share image used when someone shares the post. Each falls back to the post title, the excerpt and the cover image.
- Delete post - removes the post for good, after you confirm.
Preview
Switch from Write to Preview in the top bar to see your post the way it will look on your site, with your theme, menu and footer. It shows exactly what is in the editor right now, even changes that are still saving. Use the desktop and mobile buttons to check both sizes.
The preview leaves out the previous/next links, and the date shows when the post is scheduled for, or that it is not published yet. Links in the preview don't go anywhere. Switch back to Write and you are right where you left off.
Publishing and scheduling
A post is in one of three states:
- Draft - only visible to you in the dashboard.
- Scheduled - goes live on its own at the time you picked.
- Published - on your blog for everyone to read.
To publish, click Publish in the top bar. A small window opens:
- When - Now, or Schedule for a date and time. Times are in your own time zone, and we show which one.
- Announce in Discord - tick this to announce the post in your server. It only shows up when announcements are set up, see Discord announcements.
- A short checklist reminds you if the post has No cover image or no excerpt. It never stops you from publishing.
Click Publish now or Schedule to confirm. A scheduled post goes live by itself at that time. You don't need to be online for it.
To change a scheduled post's time, click Scheduled in the top bar. You can pick a new time or publish it right away.
The ⋯ menu next to the button has the rest:
- Unpublish - turns a published or scheduled post back into a draft and takes it off your site.
- Discard changes - see below.
- Open on site - opens the published post in a new tab.
Editing a published post
You can keep working on a post after it is published. Your edits are saved as you type, but your visitors keep seeing the published version until you click Update. The top bar shows Published · unpublished changes while there is something waiting.
- Update puts your changes on your site.
- Discard changes in the ⋯ menu throws your changes away and goes back to what is published.
- Unpublish keeps your latest changes, so nothing you wrote is lost. The post just becomes a draft.
Scheduled posts work the same way. Your edits wait until you click Update, so a half-finished edit never goes out on its own when the scheduled time comes.
Your blog page
Published posts appear at /blog on your site, newest first. With lots of posts, the page is split into pages with Newer posts and Older posts buttons. There is also a visible link to your RSS feed.
Each post has its own page at /blog/<slug>.
The blog uses your site's theme, menu and footer, so it feels like the rest of your site. To link to it from your menu, add the built-in Blog item on the Navigation screen. Your blog page and every post are also in your site's sitemap for search engines.
Layouts
Choose how posts are arranged under Blog layout on the Blog screen, then click Save.
| Layout | What it looks like | Best for |
|---|---|---|
| List | Clean rows with the date beside each post. Your newest post gets a larger title. | Most blogs, especially posts without covers |
| Featured | Your newest post gets a large, decorated panel at the top. The rest are listed below it. | Blogs with one big story at a time |
| Grid | A grid of cards with cover images. Posts without a cover get a simple text card. | Posts that all have a cover image |
The layout changes on your site straight away, without publishing your site again.
The post page
Every post page starts with a header in your theme's colours:
- a Back to all posts link,
- the date, the author and the read time,
- the title,
- the tags.
The cover image comes right after the header, followed by your text. At the bottom, links take readers to the previous and next post.
Under Post page extras on the Blog screen you can turn off Show estimated read time and Show previous/next post links. Both are on by default, and changes show up on your site right after you click Save.
When someone shares a post, the link preview uses the post's Search & sharing settings, falling back to its title, excerpt and cover image.
RSS feed
Your blog has an RSS feed at /blog/rss.xml. It lists your newest posts with their title, excerpt, tags and a link to the full post. Readers can subscribe to it in an RSS reader, and you can use it to plug your posts into other tools that read RSS.
The Latest posts block
To show your newest posts somewhere else, for example on your home page, add the Latest posts block to any page. It shows cards linking to your most recent posts. Set how many cards to show with How many posts in the block's options. It shows 3 by default. In the editor it shows sample cards. On your site it always shows your current published posts.
Your blog in the editor
You can also look at your blog inside the site editor. Open the page switcher at the top of the editor and pick Blog below your pages. It shows up once you have a published post, or once your menu links to the blog.
The editor then shows your real blog page with your design. Click a post to look at it, and use the page buttons to browse. This view is for looking only. The panel on the left has Open Blog and Blog layout settings to take you to the Blog screen. The Design and Footer & bar panels still work, so you can tune your theme while looking at your blog.
Discord announcements
Your blog can post a message in a Discord channel whenever a post goes live. Set it up under Announce new posts on Discord on the Blog screen:
- In Discord, open the settings of the channel you want to post in. Under Integrations, create a webhook and copy its URL.
- Paste it into Discord webhook URL.
- Optional: to ping a role, enter its ID in Role to ping (optional). You can copy a role ID with Discord's Developer Mode turned on.
- Click Save.
- Click Send a test to check it works. The test message never pings anyone.
To turn announcements off, empty the webhook URL and save.
The announcement shows the post's title as a link, the excerpt, the cover image and your site's name. Only the role you picked can be pinged. Nothing written in a post itself can ping anyone.
How announcements behave:
- Each post is announced once, ever. Editing, updating, or unpublishing and publishing again does not send it again.
- Scheduled posts are announced when they go live, usually within a minute.
- Skip it if you want. Untick Announce in Discord when you publish, and that post is never announced.
- Your existing posts are not announced. Setting up announcements does not post your back catalogue to Discord. Only a post that went live in roughly the last hour may still be announced once you save the webhook.
- Your site needs to be live. While your site is not published, or is in maintenance mode, no announcements are sent.
- If Discord is unreachable at that moment, the announcement is skipped and not retried.
When announcements are set up, the publish window shows Announce in Discord. If they are not, it tells you so with a Set it up link. Once a post has been announced, it shows the date it was announced.
What is live and what needs publishing
Posts don't wait for you to publish your whole site. When you publish or update a post, it shows up on your blog straight away. The same goes for the blog layout, the post page extras and the Latest posts block, which always shows your current posts.
Two things to keep in mind:
- Your blog is only visible while your site itself is published and not in maintenance mode.
- The theme, menu and footer around your blog come from the last version of your site you published. If you change your design, publish your site to see it on the blog too. See Publishing.