SCNX Sites
SCNX Sites is in active beta, and we're changing a lot of things as we go. We'll be reworking this documentation once the current beta cycle wraps up, so some details on this page may be outdated in the meantime.
SCNX Sites turns your Discord community into a real website. You get a public home page with your own address, built from ready-made blocks in a visual editor. There is no code to write and nothing to host yourself.
A site is a great landing page for new members, and a home base for the members you already have. Add a join button, show off your team, list your rules, collect applications with a form, post news, and pull in your upcoming Discord events.
The website builder is currently rolling out to selected servers. If you open the Sites section and see "Sites isn't available here", it hasn't been enabled for your server yet.
On that screen you can click Notify me about Sites. We send a confirmation email to your account address first, and once you confirm it, we email you when Sites opens up for more servers.
Once Sites is on for your server, a short note at the top of the Sites screens (outside the editor) reminds you that it is in beta. Its Send feedback link opens our feedback page, where you can tell us what works, what doesn't and what you are missing.
What you can build
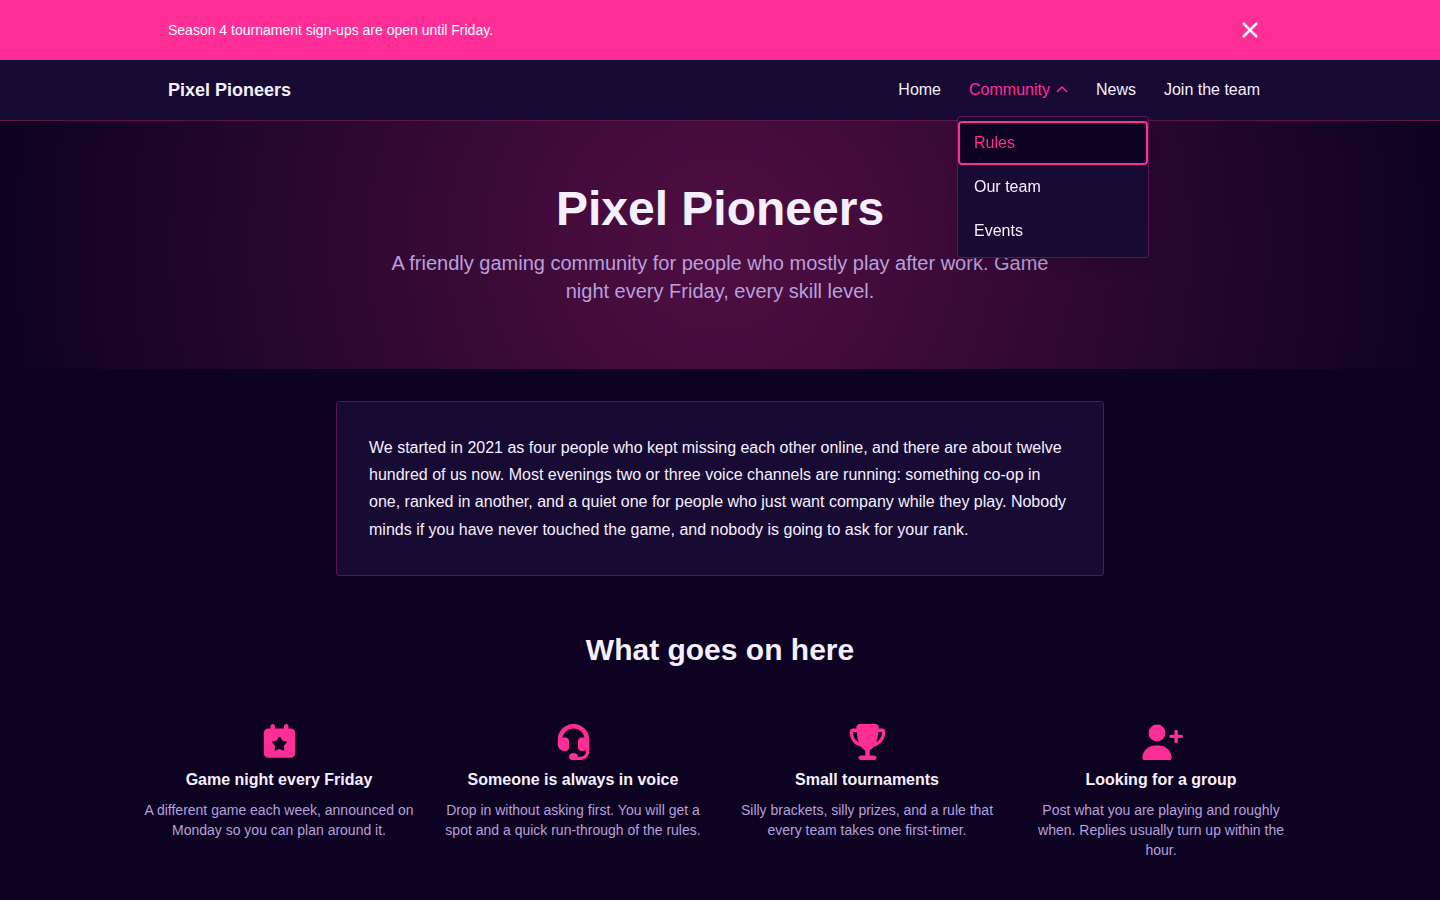
- A landing page that welcomes new members and links straight to your Discord.
- A rules page, an about page and a team page, all with a shared menu and footer.
- Forms for staff applications, event sign-ups or contact requests, with the answers collected in your dashboard.
- A blog for announcements and updates, with its own
/blogpage and an RSS feed. - An events section that shows your upcoming Discord scheduled events automatically.
- A compact link-in-bio page for creators.
How it works
You build your pages in the editor, a full-screen workspace inside the SCNX dashboard. Pages are made of blocks, a theme styles the whole site, and you click Publish when you are ready to go live. Until you publish, your changes stay a private draft.
Every site has a free address that ends in scnx.site, for example my-community.scnx.site. You can also connect your own domain later.
Create your site
Open Sites in your server's sidebar in the SCNX dashboard and click Create your site. You need edit access to the site to do this (see Who can edit a site). The wizard has four short steps:
- Name & address. Give your site a name (you can change it later in the settings) and pick its address. We suggest an address based on the name until you type your own. The address has to be 3 to 63 letters, numbers and dashes, and it has to start and end with a letter or number. A few words are reserved, and the wizard tells you right away if you picked one. If someone else already uses the address, you find out when you click Create site, and the wizard sends you back to this step to pick another one. When more than one Address ending is offered, you also choose it here.
- Template. Start from a ready-made template, or from a Blank page and build it your way. See Templates below.
- Language. Pick the language your site's built-in text (buttons and labels) should use: English or German. You can still write your own content in any language.
- Confirm. Review the summary, tick I have read and agree to the SCNX Terms of Service, and click Create site.
We create your site as a draft and take you straight into the editor, so you can work on it before it goes live. Nothing is public until you publish.
Your site is created first, and the template is filled in right after. In rare cases the second part fails, for example when our automatic content review is unavailable for a moment. Your site still exists. Click Try again to set up the template again, or Open my site anyway and build it in the editor.
Templates
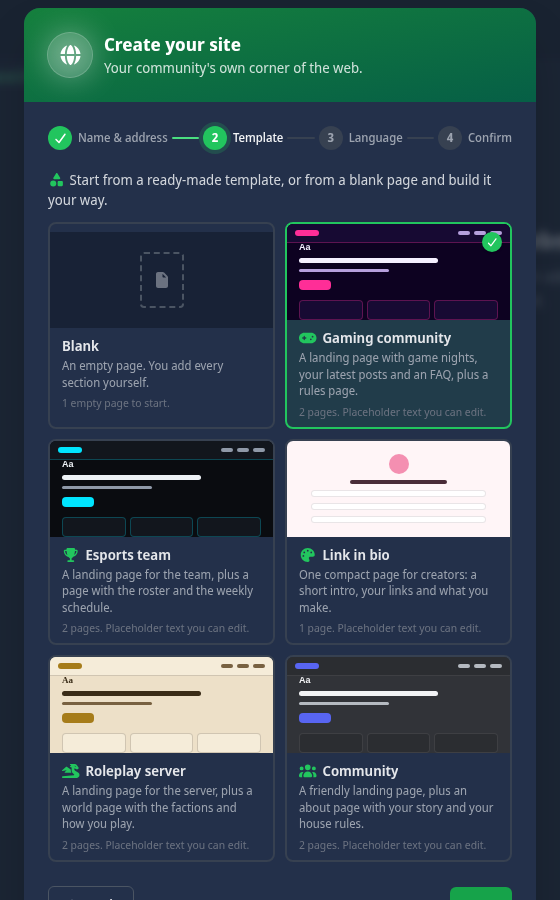
Templates give you a themed starting point instead of an empty page. Each one comes with its own theme, real blocks and a menu that already links its pages:
| Template | What you get |
|---|---|
| Gaming community | A landing page with game nights, your latest posts and an FAQ, plus a rules page. |
| Esports team | A landing page for the team, plus a page with the roster and the weekly schedule. |
| Link in bio | One compact page for creators: a short intro, your links and what you make. |
| Roleplay server | A landing page for the server, plus a world page with the factions and how you play. |
| Community | A friendly landing page, plus an about page with your story and your house rules. |
| Blank | An empty page. You add every section yourself. |
The text a template adds is placeholder text written in your site's language. Click any of it on the page to rewrite it in your own words. The Link in bio page has no menu or footer, so it is a single page on purpose.
Your Sites section
Once your site exists, the Sites section in your server's sidebar has one entry for each part of it:
| Entry | What you do there |
|---|---|
| Overview | See your address, whether the site is published, and when you last published. Open the editor or your analytics from here. |
| Pages | Add, rename, reorder and delete pages and set their layout. See Pages. |
| Editor | The full-screen workspace for page content, design, the footer and publishing. See The editor workspace. |
| Navigation | Build the menu at the top of your site. See Navigation. |
| Blog | Write and publish posts. See Blog & announcements. |
| Forms | Build forms and read the answers. See Forms. |
| Domains | Your site's address, custom domains and redirects. See Custom domains. |
| Settings | The site name, description and language, search and sharing, legal information, bot protection, maintenance mode, branding and deleting the site. See Settings. |
| Analytics | Page views for your site. See Analytics. |
At the bottom of the section, More information in our Docs links back to these docs. Entries you have no access to are not shown (see Who can edit a site).
The overview
The overview card shows your site's address, its status (Draft, Published or Disabled) and the date you last published. Open editor takes you into the workspace. If you only have view access, the button reads Open editor (view only).
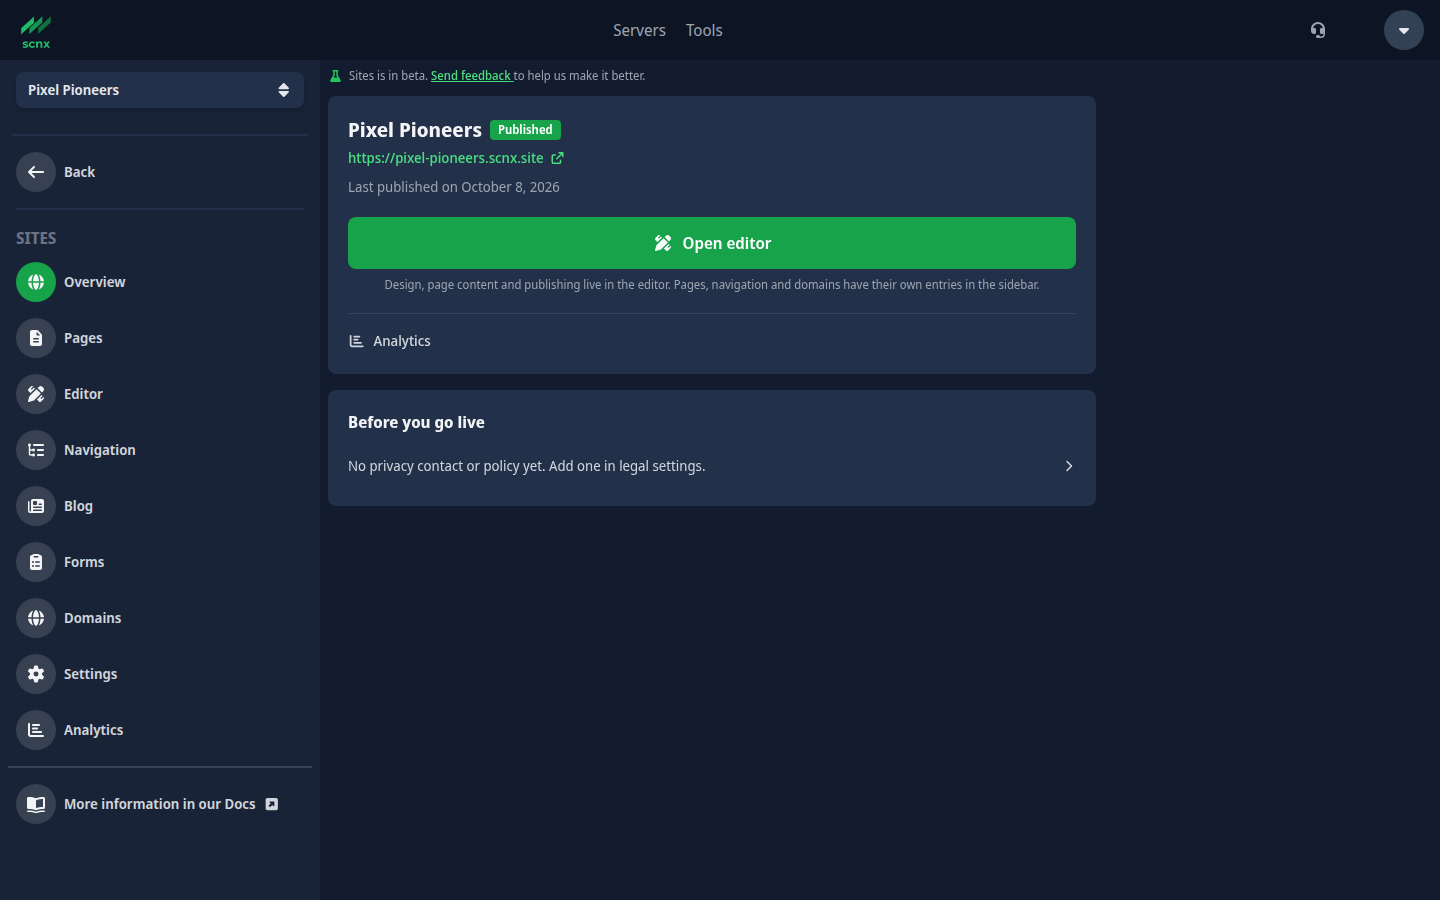
Below the card, a Before you go live list points out anything worth fixing, each with a link to the right place:
- your site is not published yet,
- you have not added a privacy contact or privacy policy yet,
- your menu is empty,
- maintenance mode is on.
Who can edit a site
Access to a site follows your server's website permissions. Server owners and co-owners always have full access. Everyone else needs the Websites permission, at one of three levels:
- View access lets someone open the Overview, Pages, Domains, Settings and Analytics, and open the editor in a read-only View only mode. They can look around and read the version history, but not change anything.
- Edit access lets someone build and edit pages, change the design and the footer, build the navigation, write blog posts, manage forms, manage redirects, change the site settings and publish. The Navigation, Blog and Forms entries only show up with edit access.
- Admin access is needed for the sensitive actions: connecting or removing a custom domain, deleting forms and their answers, rolling back to an earlier version, resetting the preview link and deleting the whole site.
If you cannot do something, you probably need a higher access level. Ask a server admin who has it.
Branding
At the very bottom of every page, under your own footer, your site shows a small SCNX bar. It holds:
- the SCNX logo with the words "This site runs on SCNX",
- a Platform Imprint and a Platform Privacy link, with the legal details for SCNX itself,
- a Report this page link, so visitors can tell us about content that breaks the rules. See Content rules & legal for what happens with a report.
If you have linked your own privacy policy or imprint under Settings > Legal information, they appear in this bar too, above the SCNX links.
The three SCNX links are on every site, on every plan. On our Professional plan and our Enterprise plan, the logo and the "This site runs on SCNX" note are hidden, so your footer carries no SCNX branding. The links stay.
This follows your server's plan automatically, so there is nothing to set and nothing to republish. A plan change reaches your site within a few minutes. You can check what your site currently shows under Settings > Branding.
Next steps
- The editor workspace - pages, navigation, blocks, design, autosave and publishing.
- Custom domains - connect your own domain.
- Forms - collect applications and contact requests.
- Blog & announcements - post news with its own page and RSS feed.
- Events - show your upcoming Discord events.
- Announcement bar, redirects & link-in-bio - smaller features for your site.
- Settings - name, sharing, legal information, maintenance mode and branding.
- Analytics - page views, top pages, referrers and countries.
- Publishing & going live - drafts, versions and maintenance mode.