Custom domains
SCNX Sites is in active beta, and we're changing a lot of things as we go. We'll be reworking this documentation once the current beta cycle wraps up, so some details on this page may be outdated in the meantime.
Every SCNX site comes with a free address that ends in scnx.site, like my-community.scnx.site. If you own your own domain, you can connect it so your site is reachable at your own address too, for example www.example.com.
This page walks through the whole setup. It is the most fiddly part of Sites, so take it step by step and you will be fine.
The Domains page
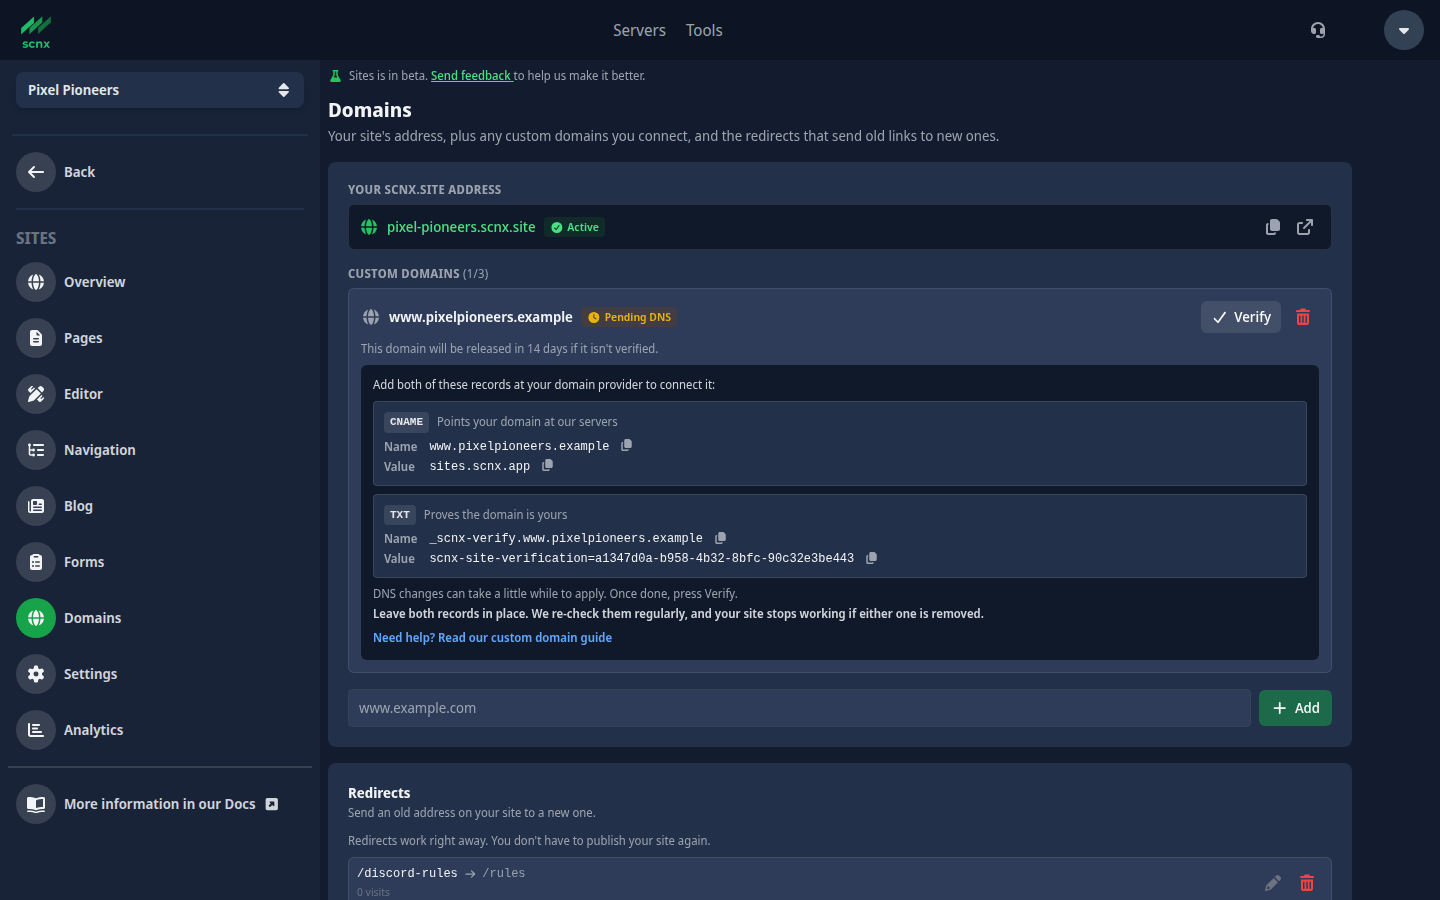
Open Domains in the Sites menu of your server's dashboard. It has three parts:
- Your scnx.site address at the top, with buttons to copy or open it.
- Custom domains, where you connect your own domains.
- Redirects at the bottom. See Redirects.
Everyone with access to the site can see this page. Adding, checking and removing custom domains needs admin access. If you only have edit access, you can still see your domains and their DNS records.
Your free address vs. a custom domain
- Your scnx.site address works the moment you publish your site. There is nothing to set up. If we offer more than one ending, you can pick yours under Address ending. The change takes effect right away, without a publish, and links that use another of our endings forward visitors to the one you picked.
- A custom domain is a domain you already own, bought from a provider like Cloudflare, Namecheap, GoDaddy, IONOS and so on. To use it, you add two DNS records at that provider so your domain points at our servers.
You can connect up to three custom domains to one site. Your free address keeps working alongside them.
The two records you need
Connecting a domain needs both of these DNS records. One on its own is not enough.
| Record | Purpose |
|---|---|
| CNAME (routing) | Points your domain at our servers so we can serve your site and get an HTTPS certificate for it. Its value is always sites.scnx.app. |
| TXT (ownership) | Proves the domain is really yours. Its name starts with _scnx-verify. and its value contains a code that is unique to your domain. |
For www.example.com, the two records look like this:
| Type | Name | Value |
|---|---|---|
| CNAME | www.example.com | sites.scnx.app |
| TXT | _scnx-verify.www.example.com | scnx-site-verification= + your code |
The dashboard shows you the exact Name and Value for both records, with a copy button on each. Always copy them from your own dashboard: the TXT code is unique to your domain.
A domain only goes active once both the CNAME and the TXT record are in place and have spread across DNS. If you add only one, verification keeps failing and tells you which record is still missing.
Connect a subdomain such as www.example.com or join.example.com. A bare root domain like example.com cannot be connected: our check looks for a real CNAME record, and a root domain cannot normally have one. Even providers that offer "CNAME flattening" on the root hide the CNAME from our check, so it would never verify.
Step by step
- Open Domains in the Sites menu.
- Under Custom domains, type your domain (for example
www.example.com) and click Add. It appears with a Pending DNS badge and shows the two records to create. - Keep that page open and, in a second tab, sign in to your domain provider (whoever you bought the domain from, or wherever your DNS is managed).
- Add the CNAME record and the TXT record using the values from your dashboard. See the provider examples below.
- Give DNS a little time to update, then come back to the dashboard and click Verify.
- When both records are found, the domain flips to Active and your site starts serving on it. HTTPS is set up automatically. There is no certificate for you to buy or install.
Your site needs to be published for a custom domain to show it. If you have not published yet, you can still add and verify the domain. Visitors will see your site there once you publish.
Adding the records at your provider
The idea is the same everywhere: create one CNAME record and one TXT record with the name and value shown in your dashboard. Only the wording of the fields differs.
Your dashboard shows the full record names, like www.example.com and _scnx-verify.www.example.com. Most providers want only the part in front of your domain and add the rest themselves: www for the CNAME and _scnx-verify.www for the TXT record. If you type the full name into a field like that, you end up with www.example.com.example.com, which will not verify. When in doubt, use the short name.
Here are three common providers as examples, for the domain www.example.com.
Cloudflare
- Pick your domain, then open DNS → Records.
- Add record → CNAME. Set Name to
wwwand Target tosites.scnx.app. - Set the Proxy status to DNS only (grey cloud, not the orange one). This matters: with the orange proxy, our check cannot see your CNAME record and verification fails.
- Add record → TXT. Set Name to
_scnx-verify.wwwand Content to the TXT value from your dashboard. - Save both, then return to SCNX and click Verify.
Namecheap
- Open Domain List → Manage → Advanced DNS.
- Add New Record → CNAME Record. Put
wwwin Host andsites.scnx.appin Value. - Add New Record → TXT Record. Put
_scnx-verify.wwwin Host and the TXT value in Value. - Leave TTL on Automatic, save both, then click Verify in SCNX.
GoDaddy
- Open My Products → Domain → DNS / Manage DNS.
- Add → CNAME. Put
wwwin Name andsites.scnx.appin Value. - Add → TXT. Put
_scnx-verify.wwwin Name and the TXT value in Value. - Save both, then click Verify in SCNX.
Any other provider (IONOS, Squarespace, OVH, Porkbun, and so on) works the same way: find where you manage DNS records, add one CNAME and one TXT with the values from your dashboard.
Verifying
After you have added both records, click Verify next to your domain.
- If both records are found, you see Your domain is verified and active! and the badge turns to Active.
- If a record is still missing, the check tells you which one, and each record in the list is marked Found or Not found. The CNAME and the TXT record have different fixes, so check the one it names and try again.
DNS changes are not instant. They usually apply within a few minutes, but they can take longer depending on your provider and the record's TTL, up to a day or so in the slowest cases. If a first Verify does not pass, wait a little and try again rather than changing the records. As long as the values match what your dashboard shows, they will be found once DNS has caught up.
Domain status
Each domain shows one of three badges:
| Badge | What it means |
|---|---|
| Pending DNS | The domain is added but not verified yet. Your site is not served on it. The two records to create are shown below it. |
| Active | Both records were found. Your site is live on this domain, and the dashboard shows since when. |
| Checks failing | The domain is active, but our last regular check could not confirm its records. It still serves your site for now. |
On an active domain, click Show DNS records to see the two records again.
After it is active
Once a domain is active, we check its records again every few hours.
- Leave both records in place. If the CNAME or TXT record is later removed or changed at your provider, the domain shows Checks failing. One failed check can be a temporary blip. If two checks in a row fail, the domain stops serving your site and goes back to Pending DNS. Your site is still reachable at its
scnx.siteaddress, and the domain becomes active again by itself once the records are back, at the next check or when you click Verify. This protects your domain from being taken over by someone else if it ever stops pointing at us. - An unverified domain is released after 14 days. If you add a domain but never finish the DNS setup, we remove it after two weeks so it does not sit around half-connected. The dashboard counts down the days left. You can always add it again.
Pick one address to share
Once a custom domain is active, your site is reachable at more than one address: your scnx.site address and each of your custom domains. Visitors on each address stay on that address. It is not forwarded to another one.
Each address also presents itself to search engines and link previews as the main version of your site. The links in your sitemap, the address shown in link previews on Discord and elsewhere, and the "this is the original page" hint for search engines all use whichever address the visitor or search engine came in on. Your addresses are not merged into one.
So pick one address, usually your custom domain, and use it everywhere you share your site: in your Discord server, on social media and in your bio. That way search engines and visitors see one consistent address.
Removing a domain
To disconnect a domain, click the trash icon (Remove domain) next to it and confirm. Visitors will no longer reach your site at that address. You can delete the DNS records at your provider afterwards.
Troubleshooting
- Verify keeps failing. Confirm both records exist and their values exactly match your dashboard. Check that you did not type the full name into a field that adds your domain by itself. On Cloudflare, make sure the CNAME is DNS only (grey cloud). Then wait a few minutes and try again.
- Only the CNAME or only the TXT is found. Add the missing one. Both are required.
- I want to use my root domain. Root domains like
example.comcannot be connected. Usewww.example.cominstead. Many providers offer a forwarding option that sendsexample.comon towww.example.com. - The domain is active, but the site does not show. Make sure your site is published.
- It worked, then the site went offline on the custom domain. A record was probably removed or changed at your provider. Put both records back and the domain becomes active again on its own. Your
scnx.siteaddress keeps working throughout. - "That domain is already in use." The domain is already connected to a site. Each domain can only be connected to one site at a time.
- The buttons are missing for me. Adding, checking and removing custom domains needs admin access. Ask someone on your team who has it.