Guild File Storage
Guild File Storage is your server's shared, centralized asset library on SCNX. It's where images, audio, video, documents, and ticket attachments all live - a single place your team can upload, generate, browse, and reuse files across every SCNX feature.
Originally an image-only library, it's grown to handle any file the dashboard or your bots need: MP3s for voice-support waiting music, PDFs attached to tickets, banners for embeds, AI-generated clips, and more. You'll find Files in your server's navigation sidebar.
Why use it
Whenever your Custom Bot, Support Bot, or dashboard needs a file - a welcome banner, embed thumbnail, voice-over clip, archived ticket attachment - it's pulled from here. One library, one quota, one team view.
- Team Collaboration: Any trusted admin on your server can view, edit, and delete files from the shared library, so your team can maintain your server's assets together.
- Works everywhere: Every file picker in SCNX (image fields, audio fields, etc.) shows this library alongside your personal files, with a one-click switch between the two.
- Upload once, use everywhere: Upload or generate a file in the server library and everyone on your team can use it across any configuration.
- Self-populating: Your Support Bot can automatically archive ticket attachments here so they survive long after Discord's short-lived attachment links expire.
Migrating from Personal Storage
Any extra storage space you previously purchased for your personal space will remain on your personal account. Personal storage cannot be transferred to a server's guild storage quota. You can continue to use your purchased personal storage as usual. Additionally, please note that you can no longer purchase new storage upgrades for your personal space.
If you have been using SCNX for a while, you are likely familiar with the personal file upload space located at scnx.app/user/files.
Guild File Storage is a completely separate, shared space. To move your existing files from your personal space to the shared server library, you will need to manually re-upload them.
- Download the files you want to share from your personal space.
- Navigate to your server's Files page.
- Upload the files into the new shared library.
Adding Files to Your Library
There are four ways files end up in your server's library:
- You upload them directly via the Files page or any file picker in the dashboard.
- You generate them with AI - images from a text prompt, or voice-support audio (text-to-speech + music).
- The Support Bot archives them automatically - ticket attachments are saved into the library as they come in, so they survive after Discord's short-lived attachment links expire.
- The Custom Bot saves them automatically - for example, mod-log proof screenshots (image evidence captured when a moderation action is taken), starboard messages (images from starred messages preserved after the original is edited or deleted), and other attachment-preserving modules.
Paths 1 and 2 are under your direct control; 3 and 4 run in the background once the related modules are enabled.
1. Uploading files yourself
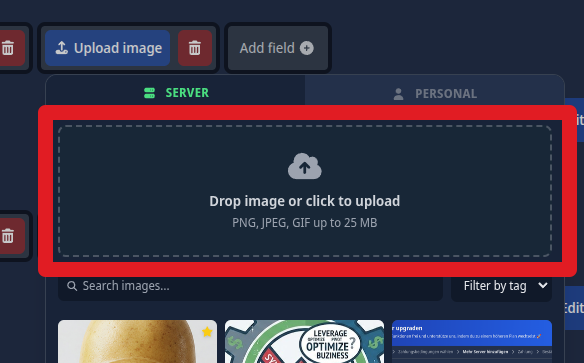
When selecting a file for a configuration field, you can also upload directly from the picker - no need to visit the library first.

- Open Files from your server's sidebar.
- Drag and drop files into the upload area, or click it to open your device's file picker.
- Multiple files at once work fine. Each one processes independently, with a confirmation toast per file.
If you upload a file that's identical to one already in the library, SCNX returns the existing entry instead of storing a second copy.
What you can upload
Every file must be 25 MB or smaller. Direct uploads support the following types:
| Category | Formats |
|---|---|
| Images | .jpg / .jpeg, .png, .gif |
| Audio | .mp3, .wav |
Bot-uploaded files (ticket attachments, mod-log screenshots, etc.) can include additional formats - video (.mp4, .webm, .mov), PDFs, ZIPs, and plain text - which then show up in your library alongside everything else.
2. Generating files with AI
SCNX's dashboard can generate two kinds of content for you, right from the relevant pickers. Both are charged in AI Coins and, importantly, neither counts against your file-storage quota - generated files are paid for in coins, not bytes.
AI images
Server owners and administrators can disable this feature in server settings. When disabled, the dashboard's Generate with AI box on the Files page disappears. Modules that use AI image generation keep working and need to be disabled separately if you want them off.
This toggle only controls image generation on the Files page. It does not hide the Generate (AI) tab inside voice-support audio pickers - AI audio generation is controlled independently.
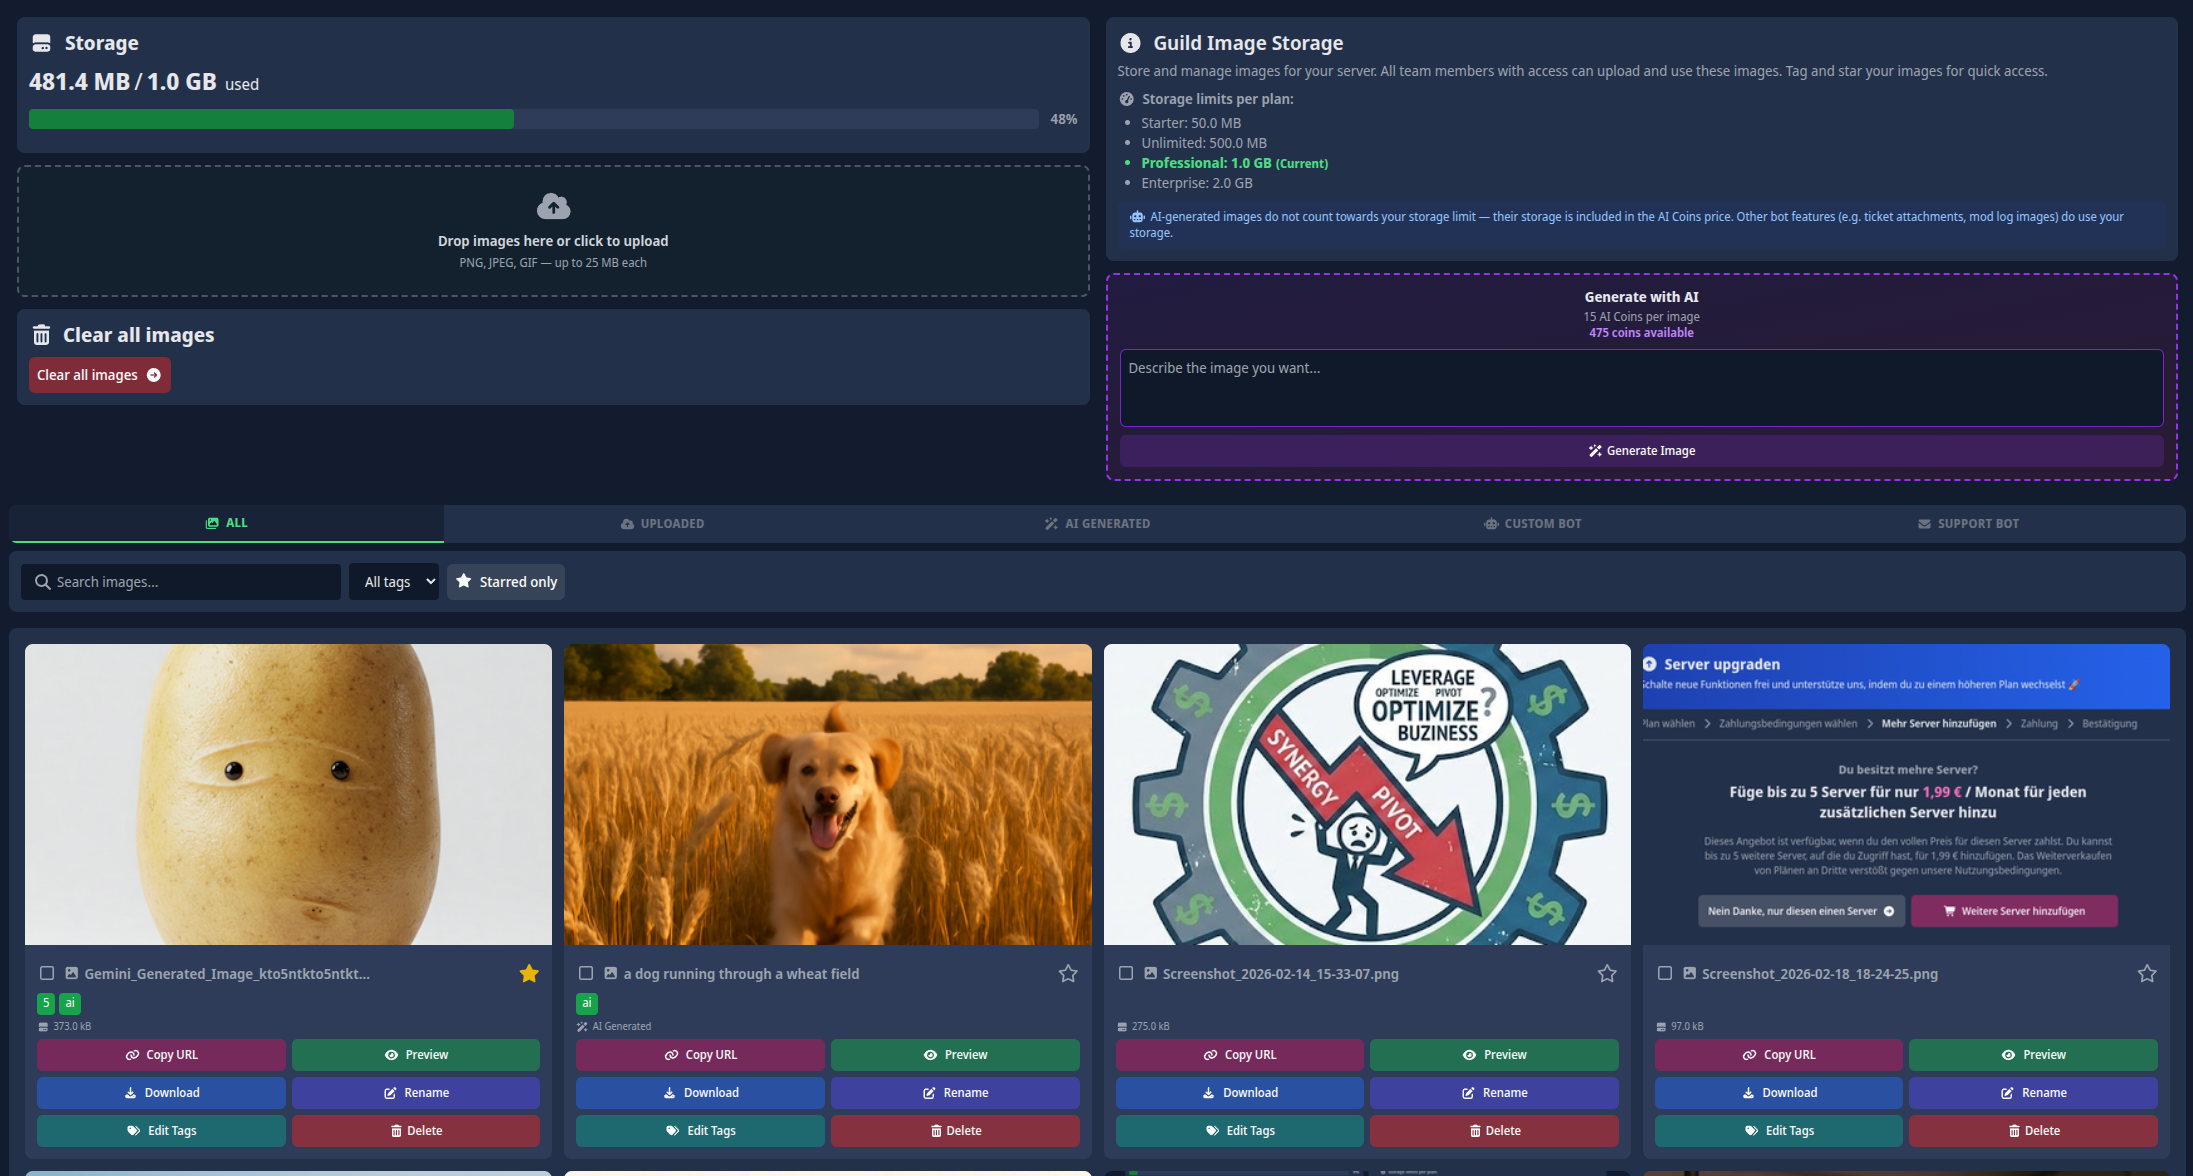
Generate an image from a text prompt, straight from the library page.

- Locate the Generate with AI box on the Files page.
- Describe what you want in up to 1,000 characters.
- Click Generate Image. The result appears in your library, tagged
aifor easy filtering.
| Item | Value |
|---|---|
| Cost | 15 AI Coins per image. Generation is blocked if your balance is lower. |
| Dimensions | 1024 × 1024 pixels. |
| Content policy | Prompts violating our safety guidelines are rejected. You're not charged AI Coins for rejected prompts. |
AI audio (TTS + music)
Inside the audio picker of any voice-support playlist, a Generate (AI) tab lets you produce:
- Text-to-speech clips - pick a language and voice, type the script (up to 10,000 chars), get a ready-to-play voice-over.
- Music tracks - describe the vibe (e.g. "warm lo-fi, mellow piano, no vocals"), pick a duration between 3 seconds and 5 minutes, and SCNX generates a loop-ready track.
Full details, pricing, and tips are on the AI Audio Generation page. Everything produced there lands in this library automatically and is available anywhere an audio picker is shown.
3. Support Bot ticket attachments
When Archive ticket attachments to SCNX is enabled, your Support Bot copies every attachment posted in a modmail or ticket-system ticket into this library as the message comes in. That keeps the file usable after Discord's short-lived attachment link expires - critical for modmail.net transcripts viewed days later.
Archived attachments behave like any other file in the library: you can browse, search, tag, rename, and delete them. Full details (including how to disable archival and how deletion interacts with old transcripts) are on the modmail.net Features page.
4. Custom Bot automatic saves
Several Custom Bot modules preserve Discord attachments into the library so they remain visible after the source message changes or is deleted. The most common are:
- Moderation log proof images - when a mod action captures a screenshot or the offending message's attachments, those images are stored here and referenced from the log entry indefinitely.
- Starboard - when a message gets enough stars to land on the starboard, any images it carries are copied into the library so the starboard entry keeps rendering correctly even if the original message is edited or deleted.
- Other attachment-preserving modules - any Custom Bot feature that needs an attachment to outlive the original Discord message uses this library.
These saves count against your file-storage quota (they're real files you're hosting). If you'd rather the Custom Bot not archive to your library at all, turn the single file-saving toggle off in the Custom Bot core configuration - it disables automatic saves across every module in one go. No need to hunt per-module toggles.
Storage limits
Every server has a storage quota based on its SCNX plan. Track your usage via the Storage progress bar at the top of the library page.
Because you pay for them with AI Coins, anything you generate through SCNX's AI tools - dashboard AI images, AI audio (TTS and music), and any Custom Bot AI features - does not take up file-storage quota. Generate as many as your coin balance allows without worrying about filling your library.
Files your Custom Bot or Support Bot saves automatically - Support Bot ticket attachments, Custom Bot mod-log proof images, starboard images, and similar - do count against this quota. Each feature that uses the library exposes its own toggle if you'd rather not archive; for example, the Support Bot's Archive ticket attachments to SCNX switch.
| SCNX Plan | Total Storage |
|---|---|
| Starter | ~50 MB |
| Unlimited | ~500 MB |
| Professional | ~1 GB |
| Enterprise | ~2 GB |
If your server hits the limit, new uploads are blocked until you delete older files or upgrade your SCNX plan. Bots that try to upload while the quota is exhausted will skip the upload transparently - the feature keeps working, it just can't store anything new.
Organizing and finding your files
As your library grows, finding the right file quickly matters. SCNX gives you several tools to keep things tidy.
Organization tools
- Tags: Group files by campaign, bot module, ticket topic, or anything else. Up to 10 tags per file (max 30 characters each). Use Edit Tags on a file card to manage them; clicking a tag filters the entire library by it.
- Display Names: Give files recognizable names. Defaults to the original filename, but you can rename to anything up to 100 characters with the Rename button. Handy for AI-generated audio, which gets a generic name out of the gate.
- Starring (Favorites): Click the ★ on any file to pin it to the top of the library.
Searching and filtering
Use the filter bar above the grid to narrow your view. Filters combine - hit Clear filters to reset.
| Tool | What it does |
|---|---|
| Search bar | Matches text in the display name or the original filename. |
| Filter by tag | Shows only files with a specific tag applied. |
| Starred only | Shows only your favorited (starred) files. |
| Type tabs | Filter by origin: All, Uploaded, AI Generated, Custom Bot, or Support Bot. Useful for finding your bot-archived ticket attachments or your AI-generated audio. |
To keep loading fast, the library displays 25 files per page. Use the Previous / Next buttons at the bottom to navigate.
Managing and deleting files
Every file card has a quick-action menu:
| Action | What it does |
|---|---|
| Copy URL | Copies the file's direct URL to your clipboard. |
| Preview | Opens a preview (images) or plays the file (audio/video). |
| Download | Downloads the original file to your device. |
| Rename | Changes the display name. |
| Edit Tags | Adds or removes tags. |
| Star / Unstar | Pins or unpins the file. |
| Delete | Permanently removes the file. |
Deleting files
The Clear all files button in the left sidebar will instantly and permanently delete every file in your server's library - including files currently being used by your bots, referenced in ticket transcripts, or embedded in configurations. Only do this if you're absolutely sure nothing active depends on them.
A file is removed from your library the moment you delete it, but some content delivery caches and browser caches may continue serving a previously-loaded copy for up to a few days before they catch up. This is standard web behavior, not something SCNX (or our support team) can force-expire. Messages already sent on Discord may load the file for longer until those messages are deleted manually.
You free up storage space by deleting files you no longer need.
- Single delete: Click Delete on an individual file card.
- Bulk delete: Tick the checkbox on multiple cards (a blue ring appears), then hit Delete selected in the top bar. Max 50 files per action.
Using files in bot configurations
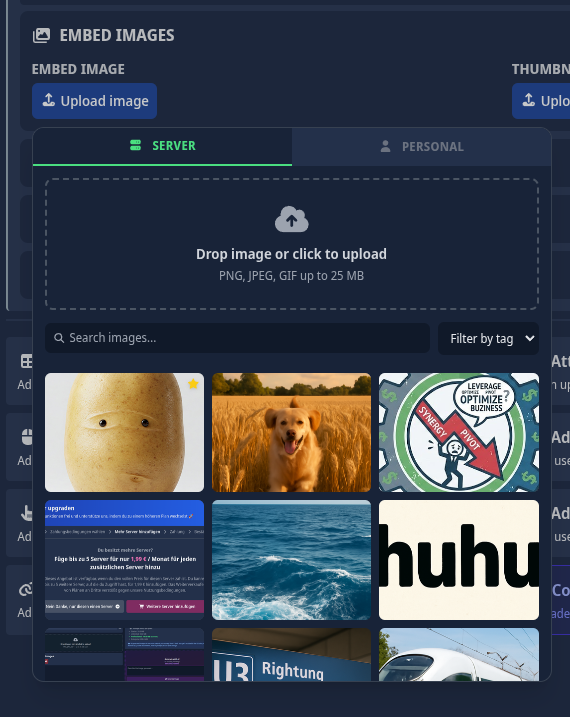
Every file picker in SCNX - for images, audio, attachments, and more - gives you access to both your server's library and your personal files in one place.
From within any picker you can:
- Switch tabs: Toggle between Server Files (shared) and Personal Files.
- Browse and filter: Search the shared library and filter by tag.
- Select instantly: Click a file and its URL populates into the configuration field.
- Upload directly: Click the upload button or drag-and-drop into the picker. The file uploads to the currently-active tab (Server or Personal) and is selected immediately.
- Generate with AI (where relevant): Audio pickers include a Generate (AI) tab for TTS and music, and the Files page offers image generation - see the AI section.